


Text and Photographs by Bernice Camlin
This is a wonderful cake suitable for all sorts of occasions - birthdays, Valentine’s, Mother’s Day, anniversary’s etc. I made this cake for the first time for my friend Lesley’s birthday and it was such a success that I have made it many times since and each time I give it a different look.
You will need
- 8 inch dark chocolate mud cake
- 1 quantity of dark chocolate ganache
- 1 pkt of Freckles, cut in half
- 1 box of your favourite chocolates
- 840g pink sugarpaste (fondant)
- 300g pink sugarpaste to make into flower paste
- Edible glue
- 1 piece 5 petal rose cutter
- yellow petal dust paintbrush
- 8 inch set up board
- 12 inch cake board
- 8 inch cake board (chocolate box lid)
- Palette knife
- Serrated knife
To make the 8 inch dark chocolate mudcake you will need
- 280g unsalted butter, chopped
- 225g dark chocolate, chopped
- 6g coffee powder or granules
- 1.5 cup warm water
- 215g caster sugar
- 290g self raising flour, sifted
- 35g cocoa powder
- 2 large eggs, lightly beaten
- 1.5 tsp vanilla or seeds from 1.5 vanilla pods
Method
- Preheat the oven to 150C fan, 170C electric oven.
- Grease the tin and line the base and sides with a collar that extends 2 cm above the top of the tin.
- Combine butter, chocolate, coffee and water in a saucepan and stir over low heat until melted, then remove from the heat. Cool for 15 minutes.
- Transfer mixture to the bowl of your electric mixer and add the caster sugar. Beat well until dissolved.
- Add flour, cocoa, eggs and vanilla. Beat on medium till well combined.
- Pour mixture into tin and bake for 1 hour 30 minutes.
- Test with skewer (which should come out dry or with a few dry crumbs attached). Cool cake in tin.
To make the dark chocolate ganache you will need
- 850g dark chocolate
- 350ml cream
Method
- Break up chocolate into small pieces and process in a food processer till it resembles coffee granules. Place chocolate in a large bowl.
- Put the cream in a small saucepan and bring to boiling point.
- Pour the cream over the chocolate and mix with a hand whisk until the ganache is smooth.
- Allow to cool completely and set overnight. This process can be speeded up by using the fridge but bring back out of the fridge before it gets too stiff and difficult to work with.
To make the flower paste you will need
- 300g pink sugarpaste
- 1 tsp of Cellogen (if using CMC, Tylose powder or Gum Trag use only 0.5 tsp)
- 1/8 tsp egg white
- 1 tsp Cream of Tartar
- A small amount of Crisco or shortening
Method
- Use a little shortening on your work surface and knead up your fondant so it’s nice and soft.
- Sprinkle Cellogen or alternative over the work surface and kneed it into the sugarpaste.
- Make a well in the mix and pour in the egg white and knead until mixed through, it may feel a little sticky, add more Crisco to the surface if you need to.
- Sprinkle the Cream of Tartar on the work surface and knead into the mix until incorporated.
- Wrap the paste in several layers of cling film tightly and place in an air tight container, leave for at least 12 hours before use. Suitable for freezing.
To make edible glue you will need
- 1 tsp Tylose powder or similar
- ½ cup warm water
Method
- Mix together the 2 ingredients until liquid turns clear.
- Leave overnight if necessary.
To make the frangipanis you will need
- 300g pink flower paste
- edible glue
- yellow petal dust
- paintbrush
- small rolling pin
- egg cartons
Method
- Knead your sugarpaste till it softens a little and roll out very thin.
- Use your cutter to cut out one flower and use the balling tool to eject the flower shape.
- Use edible glue to stick down each petal in turn.
- Turn upside down and check that there are no gaps.
- Curve petals with your fingers and squeeze stem together firming things up.
- Make about 34. Place in upturned egg cartons to harden overnight.
- Next day I painted on the dry yellow petal dust with a paintbrush.
Check out real frangipanis in order to get a realistic effect.
How to assemble the cake
The ganache
- Straighten the top of cake with serrated knife and cut in half.
- Stick bottom half to 8" set up board with some ganache.
- Use palette knife to spread ganache in middle of cake then add the top half.
- Spread ganache thinly over outside of cake as a crumb coat and chill in fridge till firm.
- Spread remaining ganache over cake and use a straight edge, such as a setsquare to neaten up the sides then use a long spatula to drag across the top making it smooth.
- Leave overnight to harden.
The sugarpaste
- Attach the cake to the 12 inch cake board with some ganache or royal icing.
- Roll out your sugarpaste. Measure the height and circumference of your cake then cut out a rectangle that is 0.5 inch taller than your cake.
- Brush the sides of your cake with a little water.
- Roll your rectangle of sugarpaste up like a bandage, making sure it is not too tight then unwind it around the side of the cake.
- Use the same bandage technique to cover the remainder of your cake board.
- Roll out the remaining sugarpaste for the lid and place it on top of the 8 inch board which you have painted with a little water or edible glue.
- Lift the whole thing up and gently press the sugarpaste around the edges of the lid and cut off excess with a knife in line with the plane of the base of the lid.
Attaching the frangipanis
- Use edible glue or soft royal icing to attach your flowers.
- I paired up my frangipanis to make a nice look and it was also easier to arrange and stick them down.
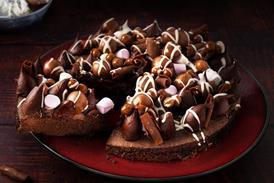
The chocolates
- Paint a line of edible glue around the top inside edge of the chocolate box and press the chocolate buttons in place.
- Arrange chocolates on top. No need to stick them down. Do stick one chocolate on top of the others near the back to help secure the lid at an angle. Try different positions so that you achieve the best angle.
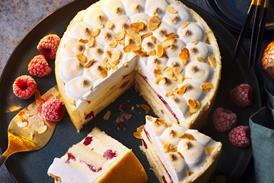
Other ways to decorate your cake
About Bernice Camlin
Bernice Camlin is a Scot who now lives in Australia. She has a passion for creating bespoke cakes, cupcakes and cookies for clients in Brisbane, Gold Coast and Byron Bay. She says: "I guess my passion for cake design began many years ago when I started making birthday cakes for friends and family. My cakes became increasingly more creative and now I love nothing better than designing new and challenging cakes with the aim of exceeding customer expectations."

No comments yet